TECHNOLOGY OF INJECTION MOLDING – LEVEL 2
Goals of this Course:
- Understand the relationship between machine controls,
plastic behavior, and molded part properties - Solve molding problems like a pro
- Achieve the best cycle time from the “plastics point of view”
- Gain strategies to confidently develop an optimized process
- Learn in English or Spanish
Optimize the Process. Moving up from Level 1, into Level 2, learners will gain a deeper understanding of the scientific method and the effect of each machine control as it relates to the “four plastic variables,” —heat, pressure, flow, and cooling, and how these variables affect part properties.
This course includes three online lessons with seven SkillBuilder™ guided lab lessons, and 12 SimTech Discovery lab lessons for a combined total of 15-20 hours of training.
This molding course assumes the student understands the effects of each machine control on the molding machine and on the plastic. Phases of learning include online coursework and injection molding machine simulation labs where learned concepts are immediately put into practice. This ability to actively apply molding concepts is a powerful and engaging way for learners to understand and retain complex material. View the “Simulation Labs” tab to see what type of lab-work you’ll be doing.
Lesson 1 – Pre-start, Safety, and Setup for a Mold Run
This lesson teaches optimizing pre-start, safety and process control set up procedures involved in improving injection molding machine operations. A review of the injection molding cycle from the “plastic’s point of view” is done, as is the indirect relationship of the machine controls to the molded part properties. The importance of startup checks on machine protection and personnel safety is emphasized. Teaches the effects of the different types of plastic on the molding process, and setting the machine controls at startup. (Includes 2 SkillBuilder™ lessons)
Lesson 2 – Mastering Machine Control Settings
This lesson moves on to additional machine controls and their effects on both the molded parts and overall cycle time. Students will learn how melt temperature is adjusted using barrel zone settings, screw RPM and back pressure. Next, students will learn how to measure the melt temperature and the importance of setting a proper cushion size, melt decompression, screw back distance and screw delay when necessary. (Includes 1 SkillBuilder™ lesson)
Lesson 3 – How to Achieve Maximum Productivity
In this lesson, the focus is on maximizing productivity once a stable process has been achieved. Student will also continue to learn how to adjust machine controls to solve molding problems. Adjusting fill rate to control burn marks, jetting and flash. Velocity-to-pressure transfer (VPT) to eliminate cavity pressure variations; cushion size to minimize melt temperature variations; melt decompression to minimize screw valve wear and drool. Additional controls having specific purposes and effects on the part properties including pack/hold pressures, mold closed time, ramping, and more. (Includes 4 SkillBuilder™ lessons)
Lessons 4-6 – SimTech Discovery Labs
This next set of lessons are actually lab work where the student enters into the discovery-based learning phase called SimTech Discovery Labs. This more advanced level of learning takes the student deeper into developing problem solving, analysis, and critical thinking skills.
SkillBuilder Guided Labs
Lesson 1 – Melt Temperature with an Amorphous Plastic
Learn how to optimize the Melt Temperature when molding an amorphous plastic using barrel temperatures, screw back pressure and screw rotation (rpm).
Lesson 2 – Melt Temperature with a Semi-Crystalline Plastic
Molding a cell phone cover in polypropylene, a semi-crystalline material, the goal of this lesson is to create and maintain a temperature of 400ºF. The available molding machine controls are the barrel heaters, screw rpm and the back pressure.
Lesson 3 – Fill Time to achieve Fastest Fill Possible
This lesson teaches how to fill the mold as fast as possible while still molding a good part using the fill rate controls.
Lesson 4 – Part Dimensions Molding an Amorphous Plastic
This lesson teaches some techniques for tightly controlling part dimensions using pack/hold pressure when molding an amorphous plastic and the effect of melt temperature on part dimensions.
Lesson 5 – Part Dimensions Molding a Semi-Crystalline Plastic
Semi-crystalline plastics, like polypropylene can be more difficult to keep tight dimensions. This lesson teaches some techniques for tightly controlling part dimensions using pack/hold pressure when molding a semi-crystalline plastic and the effect of melt temperature on part dimensions.
Lesson 6 – Part Weight
Plastic raw material is expensive. It is in the top 3 of expenses for a molder. Students will learn how to minimize material usage while still making a good part.
Lesson 7 – Machine Control Settings
Achieving the lowest possible cycle time can often be the difference between making or losing money on a molding job. There are 3 good molding practices that should be achieved to optimize any molding job. Learn what these are and how to achieve them. The machine controls available in this lesson to adjust are: the barrel heaters, screw rpm, back pressure, screw back distance, VPT setpoint, and cooling time controls available.
SimTech Discovery Labs
TIM Level 2, Lesson 4 – SimTech Discovery Simulation Labs 1-4
- TIM Level 2 SimTech Lab 1 – Optimizing VPT, Cushion and Part Dimensions
- TIM Level 2 SimTech Lab 2 – Adjusting Melt Temperature & Cycle Optimization
- TIM Level 2 SimTech Lab 3 – Solving Part Problems & Adjusting Melt Temperature
- TIM Level 2 SimTech Lab 4 – Achieving 3 Best Practices & Cycle Optimization
TIM Level 2 Lesson 5 – SimTech Discovery Simulation Labs 5-8
- TIM Level 2 SimTech Lab 5 – Solving Part Problems & Adjusting Cooling Rate
- TIM Level 2 SimTech Lab 6 – Adjusting Mold Full at VPT & Cushion Size
- TIM Level 2 SimTech Lab 7 – Solving for Burn Mark, Sink Mark, and Dimension
- TIM Level 2 SimTech Lab 8 – Solving Part Problems & Achieving 3 Best Practices
TIM Level 2 Lesson 6 – SimTech Discovery Simulation Labs 9-12
- TIM Level 2 SimTech Lab 9 – Solving for Burn Mark, Void, Warp and Dimension
- TIM Level 2 SimTech Lab 10 – Solving Part Problems & Adjusting VPT
- TIM Level 2 SimTech Lab 11 – Achieve 3 Best Practices & Solve Part Problems
- TIM Level 2 SimTech Lab 12 – Solving Part Problems & Optimizing Cycle
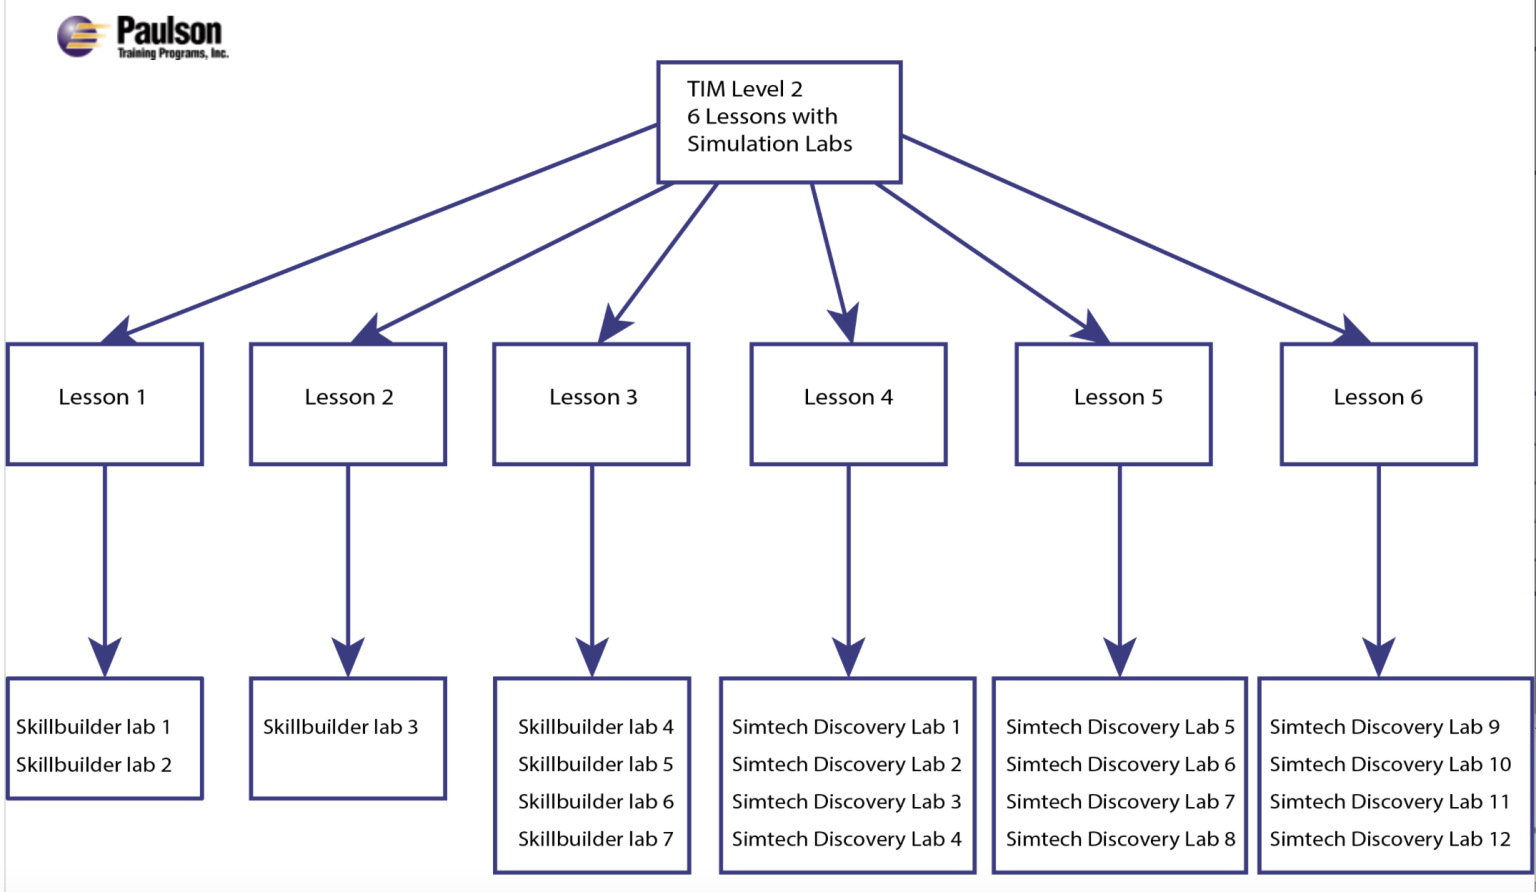
Flow Chart of Technology of Injection Molding – Level Two
The chart shows how the online coursework integrates with the Simulated Lab lessons. Molding simulation is a learning feature unique to Paulson.


